Promo Codes, Perfect Photos, and Getting Things Done
September 11, 2017

Another week has flown by and issue #2 of Mobile Mondays is hot off the presses. This week we’ve collected some useful tips for you on how to activate your App Store or Google Play promo code, how to take crisp and sharp photos of your documents, and how to keep track of your to-do lists using the latest tech.
iPhone Tip: How to Redeem Your App Store Promo Code
You may receive a mobile app as a thank-you gift for attending a conference or taking part in a survey, it may be a prize in an online competition, or just a present from someone you know. They are typically handed out as promo codes which you need to activate in the App Store in order to download your app. To those in the know, the procedure may look fairly straightforward, but every now and then people write to us saying that the whole promo code thing is unduly overcomplicated. Alas, we can’t tweak the current mechanics of the App Store, but we can provide you with a simple step-by-step guide to turning your promo code into a downloaded app.
In most cases, you get a promo code in the form of a link. You just tap it on your iPhone, iPod or iPad and a download page is displayed with the code already typed in. Simples! However, if you have nothing but the code (i.e. a combination of digits and letters), things become a tad more complicated. Here’s what you need to do (just in case: Apple has also provided a more or less complete description of all the steps on its website here).
Method 1. On your iPhone, iPad or iPod:
1. Open the App Store app on your device (that’s where you download your apps)
2. Click "Updates", and then - the icon (blue silhouette in a circle) or your photo in the upper right corner.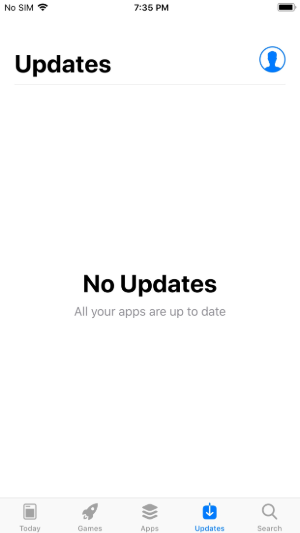
3. Sign in with your Apple ID.
4. Click "Redeem gift card or code".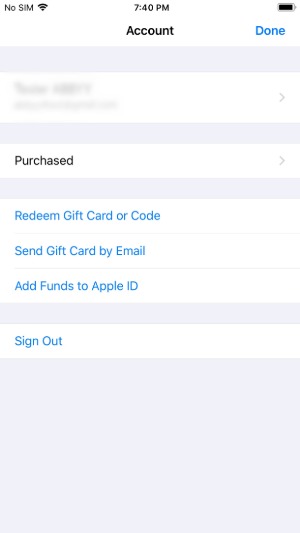
5. That’s it! Your app will start downloading immediately.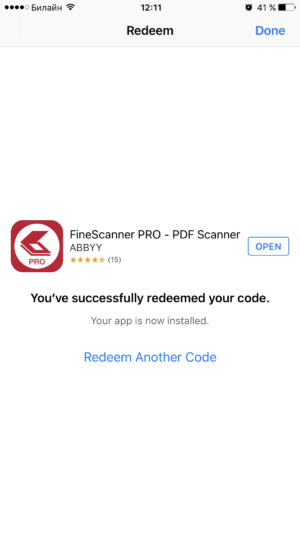
Method 2. Using the iTunes application on your desktop computer:
It’s a little-known fact, but iTunes is a handy way of finding and downloading mobile apps using your desktop or laptop computer. If you see an interesting mobile app in your desktop browser, you can install it on you iPhone via iTunes, without doing another search on the mobile device. This method is also useful if there’s currently not enough space on your iPhone. The downloaded apps will just sit on your desktop computer until you are ready to install them on your mobile device.
Here’s how you do it:
1. Open iTunes on your desktop computer and, if you are not already signed in, choose Account > Sign In and sign in with your Apple ID.
2. From the same Account menu, choose Redeem....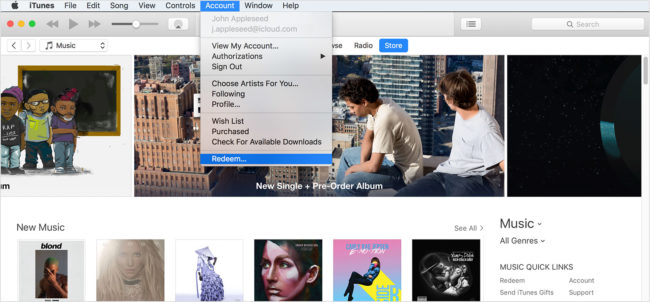
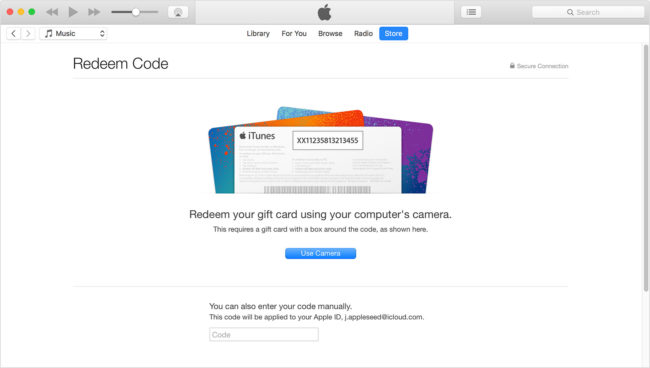
3. Enter your account password once again, then paste your promo code into the field at the bottom and you’re done.
Android Tip: How to Redeem Your Google Play Promo Code
The procedure is similar for Android-powered devices. Here again, you are most likely to get a promo link, which can be easily activated with a mere tap on your device. If you all you have is a string of digits and letters, please follow the steps below (there’re also a detailed guide from Google here):
1. Open the Play Store app.
2. Tap the Redeem icon.
3. Enter your promo code.
4. Tap Redeem and you will see a window prompting you to install the app.
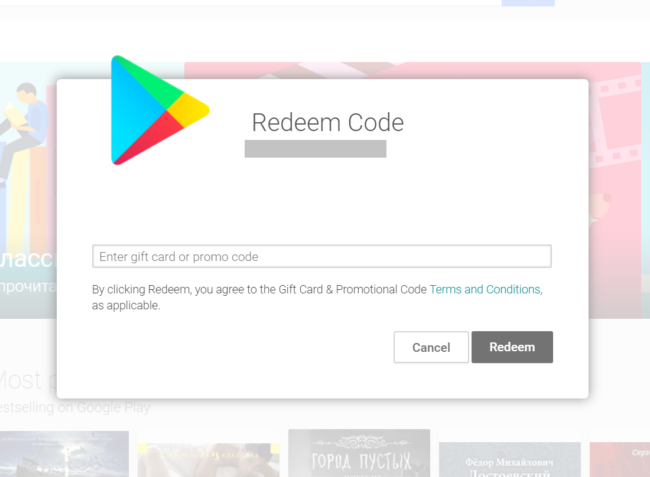
There’s also an alternative route: you can use the web version of Google Play to install the app on your (or your grandparent’s) smartphone via your desktop computer. Simply log in with your Gmail account at play.google.com to find apps and install them on your mobile device. To redeem your promo code on a desktop computer:
1. In your browser, open this address: google.com/redeem.
2. Enter your promo code.
ABBYY Tip: How to Take Photos Like a Pro
Unsurprisingly, the quality of OCR is heavily dependent on the quality of document photos you feed to the system. Smart robots, Big Data and even deep machine learning are helpless if the text on the photo is downright illegible. The good news is that it only takes one minute of careful preparation, and then ABBYY technology will work its magic to complete the process. There are several common image defects that make the OCR engine wince from pain. Here’s a few tips how you can keep the recognition engine happy and get excellent results.
1. Poor lighting. The more light you have, the better. It also helps if the light is evenly distributed. Taking snapshots at night while sitting in a car with business cards or documents placed in your lap will almost certainly not work. No technology, however intelligent, will be able to capture text which you can hardly read yourself. Naturally, there are occasions when you just have no choice, but if there’s no urgency, you’d do wise to wait for daylight and take a picture in a less shaky environment.
2. Wrong focus point is another image defect that may make you want to rip your hair out. Why is it that sometimes the camera will focus on any object in sight save the text that you need to capture? Digital cameras use special technology to determine the distance to the subject. To perform reliably, it needs sufficient lighting and high-contrast objects. Besides, it is often fine-tuned for portraits and common indoor and outdoor scenes. If your camera has hard time focusing on the text, give it a helping hand by pointing the lens to some high-contrast (e.g. black and white) area. It’s best to give the camera some time to focus on the text instead of taking a few hasty snapshots in the hope that you can improve their sharpness later.
3. Blur is caused by camera shake. It is more likely to occur in dark environments, because the camera will keep the shutter open until the sensor gets enough light. Even if you have the steady hands of a neurosurgeon, your heartbeats may transfer to the camera and cause blur. So, if your camera is not equipped with optical image stabilization, shoot like a marksman: hold the camera steady in your hands, hold your breath and softly press the shutter release button. If you need to take lots of pictures in one session, we would advise using a flexible clamp mount. We use one ourselves and can confirm that it does the trick.
4. Shadows and glare. These, too, are also caused by uneven or insufficient lighting. Using the flash may help, but its trickier with small objects like business cards. Hot spots may occur where you least expect them. If your text is printed on glossy paper, position the camera so that you don’t see the direct reflection of the lamp on the document. Light should be evenly distributed over the document. Look out for shadows. Remember that your arms can obstruct the light and cause shadows too. If this is the case, you may want to reposition the camera, move to another room or add an extra light source.

5. “Difficult” backgrounds. These can cause some headache. The background is not the subject, but it often attempts to pull the focus to itself. The general rule of thumb is to shoot against uniform backgrounds and have as few other objects in the frame as possible. Avoid white backgrounds, though.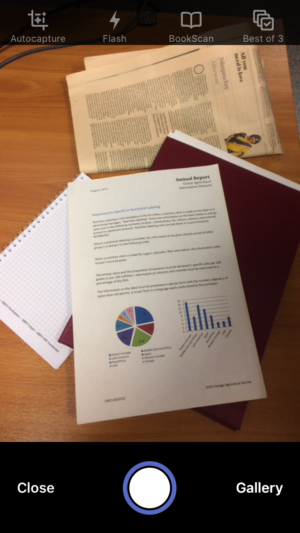
6. Poor angle. If you shoot at an angle, rather than positioning the camera directly above the document, make sure that the angle is not too steep. Otherwise, the image correction algorithms may become helpless. The trapezoid correction mechanism can work wonders, but it’s not omnipotent and won’t be able to restore the document to its normal rectangular self if you shoot it from a prone position.
7. Camera problems. Not all device cameras are created equal. If you plan to use your smartphone as a portable scanner, take a closer look at its camera specs. It should produce a sharp picture across the entire frame, be able to adjust white balance reasonably well, not distort object boundaries, and perform well in different lighting environments. Smartphones tend to be equipped with better cameras than tablets.
To sum up: uniform non-white backgrounds, even natural lighting and steady hands will give you a picture that’s perfectly suitable for OCR. Modern cameras (and users) are very good, but we hope these tips you will help you move a few steps closer to perfection.

App of the Week: Keeping Track of Your Tasks with Asana

There has never been a shortage of task managing apps, but my app of choice is Asana. It’s the task managing app that I always recommend to my colleagues and that I would like to tell you about today. Here’s what I consider its strong points that make it worthy of your attention:
1. The app is available on many platforms, including iOS, Android, and the web. For Android users, there’s a handy widget where you can create tasks. If your phone battery runs out, you can always log in to the web version on any desktop computer you have access to.
2. It takes just a few taps to add a new task: tap the plus icon, type in a descriptive name for the task, and then tap the Create Task button. You can always refine your task later by setting due dates, providing explanations, adding subtasks and links to projects, supplying tags, and setting priorities, either manually or automatically.
3. Asana offers a neat and uncluttered UI on all of the supported platforms.
Actually, Asana is actively evolving towards a project management tool with all the necessary PM features, including teams, discussions, projects, dashboards where you can add and remove project cards, etc. All the features are very well documented in detailed Asana guides (these are all in English, but it shouldn’t be a problem for most users). With all this horsepower under the hood, the app is equally useful as a personal task manager.
First-Hand Experience: Advice From a Colleague
The author of this week’s column is Anna Koltsova, Head of the Mobile Marketing group at ABBYY

I’ve spent quite some time managing projects and assigning tasks and one thing I know for certain — the more specific you are when setting a task, the more likely you are to get the result that you’re expecting. This is even truer when you assign a task to a new member of your team, especially if they lack the necessary experience. Better spend an extra five minutes on explaining everything at the outset than losing hours ironing out defects at the final stages. This rule equally applies outside your work environment. When setting a task, be sure to commit the following to paper:
- What it is exactly that you want done, specified in excruciating detail. As you write things down, numerous finer points pop up that could easily escape your attention in spoken communication. If you already have some good examples of what you want to get, as a result, share them with the person who will be doing the work for you this time (“Good artists copy; great artists steal” © Pablo Picasso).
- Due date. Even if there’s no specific deadline (yes, this happens sometimes :-)), it’s a good idea to agree on some date when you expect to get the result, otherwise “sometime in the future” may gradually degenerate into “never”.
Start reviewing interim results early on in the process. Even if it’s just preliminary sketches and tentative design, take a look—just to be sure that the work is progressing in the right direction. Otherwise, at some later stage, you may find out that the result is so far from your expectations that the project has to be scrapped and started from scratch. And people generally don’t like going back to square one.
We hope you find these tips useful. As always, your comments, ideas, and suggestions are very welcome and will be considered with great attention. See you next Monday!
